Friday, December 7, 2012

Decking the Cottage

I LOVE Christmas.  Love love love it.  I love the lights, the family, the food, the colors, the happiness, the joy, the presents, the decor... I could go on. 

On the Saturday after Thanksgiving, the hubs and I had a revelation that not only would this be our first Christmas together as a hitched duo, but it is also the first time we have our own place to deck with all the glory that is the holidays. 

So off we went. 

First Shawn put up lights around the house.  Just a few colorful strands lining the front of the house and roof and some running down the gutter next to our front door.  Sure, it's not anything people will ooh and aah at, but we do.  Every time we drive up at night we make sure to remark, "why look at this charming little cottage.  How lovely."  It's fun.

Our little cottage was made even more lovely by our additions last weekend.  First, we bought a little tree.  My family rarely did the whole live Christmas tree thing so getting a live tree is a big deal to me.  But we figured this was a special occasion.  It's a smaller one, just 5 feet tall, and nice and skinny so it doesn't take up too much space in our tiny living room.  We decorated it with all the ornaments from both our childhoods.  It's kind of perfect.

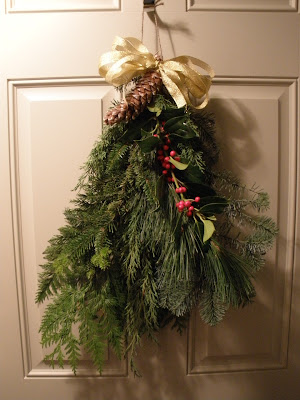
The other thing I did was make a holiday bouquet to hang on the door.  Shawn kind of wanted a wreath but we didn't really want to pay for anything else (other than the tree) that was going to die.  So I got the idea that maybe I would make something festive.

First I started with a pile of branches carefully selected from around my house.  Some pine, juniper, 2 kinds of fir, some holly complete with berries, and cedar.  I also found a pine cone along the interurban trail behind my house for an accent.

Way more that I needed.
Then I arranged them on the floor in a nice array.  I'm no florist, so I did the best I could.

I had a lot left over.
Then I banded them tightly with a rubber band including the pine cone.

The stems will all be different lengths but they can be cut after they're banded.
Next I made a festive bow out of some ribbon and tied that around the top to conceal the rubber band.

Thicker ribbon would have made a prettier bow, but it's all I had.
That's it.  Hang it on the door and all your guests will be greeted with a nice, fresh-smelling piece of festive fun.  I really like the word festive.  Can you tell?


There's nothing better than sitting in front of the fire, surrounded by the smell of a live Christmas tree, watching some great BBC programming.  It really helps in getting through the sad, cold, dark, wet Seattle winter.

Monday, December 3, 2012

Fluffier, Warmer, Stronger, Better

We've got some happy chickens.  Well, I don't know exactly how happy the ladies are (I'm sure they are a bit,) but I sure do know one chicken mommy who is happy.  Why am I so happy?

See exhibit A:

Her tail is still in the process of coming in fully.
Now see exhibit B:

Fluffy belly!  I haven't seen this in over a year!
and exhibit C:

Elsie's pantaloons are as fluffy as ever.
and finally, exhibit D:

Pearl is even whiter than she was before.
They are fluffier, their colors are bolder, they look cleaner, and I can rest easy that they have a full down jacket on during these upcoming cold winter months.  The only worry I have left is that Abby decides too late in the game that she wants to join the molting club also.  If that's the case, she may find herself sleeping in the garage for a bit.  I can breathe a sigh of great relief.

And a bonus:

Thursday, November 22, 2012

Some Thanks and a Recipe I am Thankful For

Happy Thanksgiving all!  Ah, I love holidays and all the joys and excitement it brings.  Despite it being a pretty busy day, I think we all need to slow down and take a moment in our day to think about all the things we are thankful for.  My rolls are rising in the oven, so this is my perfect time.

This year has been a particularly thank-full year.  I am thankful for the lovely situation that came about and put us into our new cozy home.  I am thankful for all the little birdies outside who are currently enjoying a Thanksgiving feast from the recently refilled bird feeder.  Chickadees eat hastily, before the juncos shove them aside, finches take a bite here and there, while the nuthatches hang upside down and feast.  All movement and flitting about is temporarily disturbed when the big guns show up: Stellers Jays and Flickers scare the little ones away for a bit, but their sheer number gives them the courage to hold their own.  This lovely scene is simply topped off by the pair of hummingbirds that come daily to visit our hanging fuchsia plant.  (Sigh.)

I am also thankful for the ladies getting their feathers back.  Frannie looks better then ever, and both her and Elsa are back to their normal selves.  Also, I, as well as the chickens I assume, am thankful for the awesome chicken coop that we built this year that is impervious to large rains.  Gone are the days of coop flooding!

I am thankful that I live in a household where we both have jobs, considering the struggles that so many people are still going through in finding employment.  What we have might not be much, but it brings us satisfaction and sometimes you just have to be glad for that.

I am thankful for my Gus and Nikolai, and even Skipper for welcoming me home each day, keeping me warm while on the couch and giving me unconditional love and affection daily.  They may be a pain in the ass at times and prevent us from going on any trips, but they are my babies and I wouldn't know what to do without them. 

I am thankful for my friends and family, who I can always count on to make me laugh, keep me grounded, and who's presence will never allow me to feel the pangs of loneliness.

Finally, I am thankful for my Shawn.  I am thankful for the amazing epic day we shared called our wedding that I still look back on with excitement.  I am thankful for his "stepping up" that suddenly happened after the wedding and all the hard work he puts into our household and keeping our home feeling warm and cozy.  I am thankful for his daily dealings with my crazy and reminding me it's ok to be myself.  But most of all, I am thankful for the love that he shows me each day, I only hope that I am able to reciprocate in a way that makes him as happy as he makes me.

May we be this jolly for ever and ever.
Now back to those rolls.

This is a recipe that my family has been making for as long as I remember, and since they are SO DELICIOUS, naturally, they only get made for the Thanksgiving and Christmas feasts.  Though I would like to make them more often since they are SO DELICIOUS, they would probably lose their charm so I painfully await them each year.  I've taken them to many a Thanksgiving feast outside of our family and I get rave reviews each time.  I've heard people call them Firecracker Rolls, Orange Rolls, or just "those amazing rolls."  Seriously, you'll be thankful for this recipe.

Holiday Citrus Rolls

Ingredients
One large orange
1 1/2 tsp. Lemon or Orange Zest
1 tsp. salt
1 tsp. cardamom
1 packet yeast (2 1/4 tsp)
5+ cups bread flour
1/2 cup sugar
4 tbs. butter (plus 2 more for later)
2 eggs

First, zest the lemon or orange.  Then squeeze all the juice out of the orange into a 2 cup Pyrex measuring cup.  Add one cup of water and the butter to the juice and heat until the butter is half melted.  In a large mixing bowl, stir together a cup of flour, the yeast, the cardamom, the sugar, and the salt.  Add the warmed mixture and stir till smooth.  Then add the eggs and zest, stir until smooth again.  Now add the rest of the flour until the dough gets to kneading consistency.  Turn out onto floured surface and knead for about 10 minutes.  Place into greased bowl and let rise for about an hour or two.  (I did it overnight since I wouldn't have time to make it and bake it the next morning and it rose really well.)

After first rise, punch down and knead for another couple minutes.  Cut them into the size of your choice and shape them into balls.  Place them into a greased casserole dish or a high sided jelly roll pan about a half an inch apart and let rise again until doubled in size, about 45 minutes.  Melt 2 tablespoons of butter in a dish.  Paint the tops of each roll with the butter then sprinkle with some sugar.  Bake at 350 degrees for 20 minutes or until golden.  Enjoy.  The fluffiness, the crunchy sweetness of the sugar, and the citrus/cardamom combination is to die for.  Try not to eat them all before dinner.  I've eaten two already.  You know, for poison testing.  But don't worry, I made a batch and a half so there's plenty left... as long as I don't eat them all on the ferry to our dinner destination.

I am so lucky to have so many things to be thankful for.


Sparkles...

Saturday, November 10, 2012

No 'Poo: The Conclusion

Before I get started, I have a challenge for you.  What is this a picture of?  Hint: it came from the kitchen.  (Don't scroll down if you don't want the answer right away.)


So it's been five weeks since I started my no shampoo experiment.  Last time you heard from me at the end of week two, I was feeling a little disappointed in how little my hair had improved and the stickiness that was lingering.  I was also noticing dandruff that I didn't notice before, which just about made me quit the whole thing altogether.

Luckily, things have gotten a ton better since.  First, I experimented with the amount of vinegar I was using, and found that it really doesn't make too much difference.  I think using less worked better for me, and I focus spraying to the ends of my hair to help with de-tangling.

At the end of week 4, my hair went through a breakthrough.  The stickiness I was feeling, which made it feel like my hair wasn't clean at all, suddenly went away.  It still gets too greasy to go more than 2 days without washings, but now, each time it's been washed it feels just like it did when I was using shampoo. 

I've also begun using baking soda to wash my face.  It's got great exfoliating powers, and it rinses away much easier than face soap.  And my face feels super clean.  I use it every other day.

To top it all, I'm so used to the hair washing proecss now that I don't even think twice about it.

I was skeptical there for a while, but I think this no 'poo thing is here to stay.  Yes.

Ok, now for the answer to our little riddle.


Eggs!  It happened when I was trying to oil them.  Usually when an egg cracks while boiling only the white comes out.  But for some reason, the yolk broke and all of it came out and solidified in ribbon form.  So cool and kind of gross at the same time.

Wednesday, November 7, 2012

Korean Mac and Cheese.

It's cold.  I feel like summer just ended and winter hit us like a ton of bricks.  This calls for rich, hearty, soul food that warms from the inside.  Dduk Bok Ki, or as I like to call it, Korean Mac and Cheese, does just the trick. 

I was introduced to this delicious dish several years ago when a friend of mine brought it to our big family and friends Thanksgiving feast.  There was cheese, lots of carbs and a delicious spicy sauce.  It made me happy in just the same way mac and cheese does.  Thus, we dubbed it Korean Mac and Cheese.

So here we go.  First you need to go to an Asian or Korean food market and get a package of dduk and gochujang, a Korean hot chili paste.  Dduk are basically rods of rice gluten.  In addition to that, you are really free to add whatever you want.  To make it as healthy and wholesome as possible, I also included fried tofu, carrots, cabbage, onion, and red and green bell peppers.  (In the past, I've also made it with fish balls instead of tofu.)

First you have to make the sauce.  In a small bowl, mix 2 tablespoons of the gochujang with a tablespoon of sesame oil, 2 tablespoons or so of soy sauce, and a tablespoon of sugar.  Mince a clove of garlic very finely and add that to the sauce as well.  You can add salt and pepper of you want, but all those ingredients are really heavy on flavor so I don't think the salt is necessary.  Set aside.

Cut the dduk rods into 2 inch pieces and place in a bowl of cold water.  Set a separate pot of water to boil.

Now, saute onions for a few minutes in a large wok or saute pan.  Add the carrots, cabbage and peppers and cook for several minutes. 

Boil the dduk for about 5 minutes.  They will float and puff up when they're ready.  Add a tablespoon of the boiling water to the sauce that you made earlier.  This makes mixing it in at the end a little easier.

Before the dduk.
Once the dduk are boiled and the vegetables are cooked and heated through, add the dduk to the pan and pour on the sauce.  Stir to combine. 

After the dduk and sauce.
Now you're almost there.  At this point, I bet many of you are saying "Hey, where's my cheese?  How can it be called mac and cheese without any cheese?"  Trust me, I totally understand, I too feel very strongly about cheese.  Never fret, here it is:

Slice up some cheddar baby!
Layer the top of the whole pan with slices of cheddar and cover to let it melt all delicious-like. 

Now, you're finished.  Sprinkle on some sliced scallions and sesame seeds, and try not to eat the whole pan.  It's really easy.  But it's also really easy to get a major stomach ache because of it.  There are two things in this world that, never fail, I will eat until I am in complete pain.  Those two things are Popcorn and Korean Mac and Cheese.  Don't be like me.  Don't get a stomach ache.  But enjoy.  It'll keep you warm all over.

It's even prettier with the scallions and sesame seeds.

Saturday, November 3, 2012

Weekend Update

Remember my pumpuchinis?  So they totally grew to be a pretty decent size and for the most part turned orange.  We got three of them.  One was given to the neighbor kids who helped with the planting of the plant, one was carved into a Jack-o-Lantern, and one still sits awaiting its fate.  The reason we didn't carve the third one is because carving the first one was such a pain in the ass.  I don't know why, but the outermost skin of the pumpuchini was super duper hard.  It almost had a candy shell that broke when the knife was stuck into it.  My design I had in mind had to be simplified, but after just one injury to the palm of my hand that I acquired when my hand slipped down the knife, I was able to carve to completion.  So the moral of the story is: crossing zucchinis and pumpkins results in fruit that is more worthless that its parents.

Pumpuchini on the right, regular pumpkin on the left.
Now remember Frannie's poor feather affliction?  Well, it's gotten both better and worse.  It's gotten worse because now she's officially molting.  Like, Elsa style.  She has huge patches of baldness on her wings, but also has a ton of pin feathers.  She also has pin feathers on her belly where all of her previous baldness was, so once this is over, she should be as good as new.  Speaking of pin feathers, Elsa also has so many covering her whole body that she looks like a porcupine.  I apologize for the series of poor quality photos, but it's hard to take pictures of chickens when you can't hold them.

Porcupine.  One week ago.
Pin feathers slowly opening up.
She's so ugly it's cute.
Is this a bit much?  Sorry for the ass shot.
This is the first year we are letting the ladies have a winter.  For the past 2 winters, we've had lamps in their coop to keep their daylight hours up to maintain their laying.  Though it was nice to have fresh eggs all year round, I got to worrying about their health and their calcium levels.  If nature decides that they need a break, who am I to deny them their break?  Since the days have been getting shorter, their laying has really declined to the point where we get an egg every other day.  I'm sure it'll get to be zero here soon, and I'll have to buy my first dozen eggs in over 2 years.  I think this is why we haven't had a molt until now.  The moral of this story is: let your ladies rest in the winter.  That way their bodies won't get confused.

Now lastly, remember the peas that I planted at the end of summer?  I did it last year with not so good results, and this year, though much better, proved to still not be worth the seeds.  I think I harvested a total of 10 pea pods.  One last moral for ya: peas don't grow too good in the fall.

That's all I have for today.  Good night everyone.

Monday, October 29, 2012

The Fall Garden

Everyone thinks of summer and spring as the best times to be in the garden.  Though I wholeheartedly agree, (warm weather, sunshine,) the garden in the fall is quite lovely as well.  You just have to go outside and look closer.

Volunteer arugula seeds germinating.

Cool stink bug I found on a board in the dark corner of the shed.

Blueberry plant ready to hibernate.

More peas! (From the seeds I planted in July.)

The kale is coming back!

Wednesday, October 24, 2012

Oven-Dried Tomatoes!

Dude, don't you love sun dried tomatoes?  I sure do.  But why are they so expensive?  I'll tell you why: because they take forever to dry!

After weeks of stressing over whether I was going to get any tomatoes this year, my wishes were rewarded with pounds of little tomatoes thanks to the extended summer we had.  We ate a bunch of them but we're still getting them.  And to be honest, I'm not a huge fan of a straight tomato.  So eating them as is is not something I can do easily. 

Since my counter and 'fridge was getting over-run with them, I really needed to do something about it.  I already have three large jars of canned tomatoes from the canning party my family had late in the summer so I didn't feel like I needed more.  Then I had an epiphany: sun dried tomatoes!

But the sun is gone, so the oven did the trick.  I made two batches.  Here's the process:

I started with my heirloom tomatoes that I grew from seed that I saved last year.  These tomatoes aren't very big, aren't very lumpy like normal heirlooms, and come in various sizes.  I had ones that were as big as a roma, down to ones just larger than a cherry. 

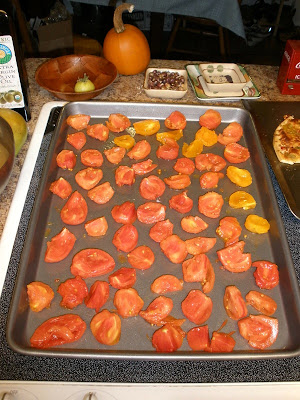
So for the first batch, I just cut them into quarters or halves.  I cut out the green cores where the stems were and gave them a little squeeze to get out any extra juice and seeds.  Then I arranged them onto a wire cooling rack and a cookie sheet sprayed with a little olive oil.

For the next batch, I peeled the tomatoes using the quick boiling method.  (Boil the tomatoes for 45 seconds, then put them into an ice bath.  The skins will then peel easily.)  Then I did the same.  Cut, core, squeeze, and arrange onto a cookie sheet.  Here is what the peeled ones looked like:


I then put all the trays into an oven heated to 200 degrees.  I was a little worried that 200 degrees would be too high, but I think it was perfect.  I checked on them after a few hours and they were still pretty soggy. 

BEFORE: Skins on top, naked ones on the bottom.
After 4 hours, I had to go to bed, so I turned off the oven and just left the tomatoes in the oven.  I then woke up the next morning and just turned the oven back on and gave it another 5 hours.  I decided they were finished when they weren't quite crispy, but more rubbery.

And AFTER!
So shriveled...
I kept the two batches separated and ended up with probably 2 cups worth.  I put them in baggies and sucked out as much air as I could with a straw.  Into the freezer they went and are ready for use!

*I actually used them tonight and mixed them in with some brown butter sage sauce with chantrelles to put over butternust squash ravioli, and it was delicious.  So much good tomato flavor!  I guess it makes sense that when you take all the water out of a tomato, you're just left with pure flavor!  I think this was a pretty smart use of my tomatoes that I will be enjoying for a while.

Sunday, October 21, 2012

Holy Molting Batman!

Ok, here is what real molting looks like in a chicken:

Poor Elsie...
It actually looks like a kill site.
She is losing feathers so fast, everywhere she goes, she leaves a trail behind her.  There are a ton in the run, a ton under her roosting area, and a bunch in the nesting box.  I had read about some chickens molting really quickly and looking nearly bald for a couple days, but now that it's happening one of ours, I'm kinda freaking out. 

She's been kinda antisocial and is really against us touching her.  I think she's pretty uncomfortable.  We're not really planning on touching her either since when Shawn tried to pick her up, he ended up with a handful of feathers and an angry hen running away.  I really hope they grow back soon.

Pearl and Abby are also showing signs of molting since some of their feathers are mixed in to the pile, but for now, Elsa is beating all of them with her severity.  Maybe they'll catch up soon.  Man, I'm going to have a bunch of bald chickens!  And why do they do this in the fall and winter when it is starting to get cold?  Nature can be so silly sometimes...

Oh, and Frannie is much the same.  She actually looks better than Elsa does at this point.  We've been dusting her with DE for the last several weeks and there hasn't really been much change.  At this rate, if her feathers don't grow back, I may have to knit her a pair of pants.  (...and that visual makes me laugh out loud.)  Since no change has occurred since we started dusting her, Shawn and I have come to the conclusion that she is probably in the perpetual state of getting ready to go broody.  We think she just wants to be a mommy so bad that she continues to get her belly ready to sit on some eggs whenever they show up.  I'm willing to bet money that if we were to leave an egg in the nest for her, she would start sitting on it.  But then we would have a bigger problem on our hands so that won't be happening.  Oh hormones, what do we do with you?

Saturday, October 20, 2012

The No 'Poo Diaries: Week 2

Sunday
Much the same.  Went to the gym so had to give it a wash.  Still feels pretty good.

Monday
Finally woke up with bad hair.  It just doesn't lay right, and it feels a little sticky.  I think my bangs are just starting to get a little long.  I should trim 'em up a bit.  Maybe this means that all the residue from years of using chemicals to wash my hair has all been stripped out.  Now my hair has to get used to this new stuff.  It doesn't smell like my old shampoo and conditioner anymore either.

Tuesday
Looking a little greasy through the day, had to put it up to make it look ok.  Washed it using the normal process.  What I noticed during blow drying though, that my hair seems to be lighter in color.  I wonder if the vinegar and heat combination is adding highlights to my hair?  That would be totally cool.  I like it.

Wednesday
Woke up with awkward hair again, still haven't trimmed my bangs, I really need to do that. 

Thursday
My hair feels super sticky today.  It's not really soft, but honestly, it still looks pretty good.  As long as you don't touch it, it looks fine.

Friday
Pretty much the same as yesterday, sticky feeling, but looking fine.  By the end of the day it was starting to get pretty greasy again.  Now that I'm coming up to on two weeks since starting this, I'll have to think about some tweaks to my regimen.  Still washed it with the regular amounts of baking soda and vinegar.  Blow dried it and if feels GREAT.  And it looks great too.  It's a shame I'm going to bed and will likely wake up tomorrow morning with bedhead.

Saturday
My hair feels a little different today.  Not sticky, more smooth, and looking great.  I won't be washing it tonight but starting tomorrow, I think I'm going to change up the amounts of stuff I'm using.  Now that it has been almost two weeks since starting this experiment, the little soldiers on my scalp that make oil should be getting used to not being stripped of all their hard work and should be slowing down production.  I was hoping that eventually it will get to the point where I only have to wash my hair every 3-4 days without it looking greasy.  I really hate washing my hair and blow drying it is such a pain.  Clearly I'm not there yet though, and I'm wondering if lessening the amount of vinegar I'm using as conditioner will help.  I think  I'll try that.  Let's see how it goes!

And here is a lovely picture of Nikolai:

Thursday, October 18, 2012

All Life is Sacred... Unless It's That of an Ant

The Sounders say no to ants under the sink.
For the last several days, the hubs and I have been waging war against ants.  And unfortunately, this is the second battle we've faced since moving in to our house. 

Even before we officially moved in, I had a feeling ants would be a problem since they were crawling up the outside of the house.  Within days of moving in, we were fighting them.  They were coming in through under the molding around the front door to get to the cat food in the dining room, through a power outlet into the kitchen to get at anything on the counter, through a mystery access area from our closet to get to a hairball extruded by Gus in our bedroom, and through a crack in between our bathtub and vanity to get to water in our bathroom. 

Seriously.  Think orcs and uruk hai swarming the fellowship in Lord of the Rings.  There's a never-ending supply of them, and they just keep coming, no matter what you do.  The only thing to defeat them is something more sinister and evil than they are, or to just run away.

Since we can't run away, the only thing we've been able to do is kill the ones we see, try to close off entryways, and keep minimizing their food source by being extra clean and meticulous about putting things away in sealed containers.

We haven't had to resort to the real sinister stuff thus far.  (By sinister stuff, I mean the hardcore chemicals.)  First we put down a nice layer of diatomaceous earth all around the outside of our house.  We definitely saw fewer ants after this.  And dude, this stuff is CRAZY.  While putting it down, we saw it in action.  Any ant that fell into a pile would writhe in agony for about 15 seconds and would go still.  It was AWESOME.  How it works is that the tiny dead diatoms (one-celled organisms made of silica) instantly absorb the lipids on the outer layers of the ants' exoskeletons, causing them to dehydrate.  I like to think of it as like the ants falling into a pile of super sharp samurai swords.  (At least that is the effect it has on them.)  Diatomaceous earth is considered a mechanical insecticide, and since it is not a chemical and is a naturally occurring substance, I feel completely at ease with using it around the house.  This also took care of the ants coming in from the front door.

As far as the ants coming from inside the house, we started off with Terro ant killer, which is basically a sugar/Borax mixture.  (Borax is also a naturally occurring chemical known to nerds as sodium (tetra)borate.)  This is a clear liquid that you drop onto a piece of thick paper.  The ants take it back to the colony and it is supposed to kill the colony from the inside out.  The bottle says that it could take up to two weeks to take effect, but we used it religiously under our sink for three weeks and the ants just kept coming.

Our semi-effective arsenal.
We then got tired of this and tried an ant spray.  Shawn found a spray that was soybean oil-based that said it was safe to use in the house around kids and pets so I was ok with this.  This stuff also kills ants instantly but it only works if the ants are doused in it.  It leaves an oily residue that the ants don't like so it also works to close off certain entry-areas.  This worked to take care of the ants in the bathroom.  We sprayed the ants under the sink and where they were coming from so I assumed that we had beat them.

Terro is delicious.  But does it kill them?
Until 3 days ago.  (Sigh.)  This time, they were coming in from the crack between the molding and the brick that lines the outside of our fireplace.  And the worst part of it was that they found the food in Skipper's cage.  They were ALL OVER.  It was so sad.  His food dish was full of them.  We tried spraying the crack where they were coming in but it only worked for a few hours, and unfortunately we couldn't spray the carpet or lay down diatomaceous earth.  For now, we've killed all the ants that were around and put down a bit of Terro.  They are still coming in, but at least the bait station has deterred them from getting into his cage.  They are also back under the sink.  I think the cold weather we had for a while made them go away, but since it's been a little warmer they're coming back again.  I'm hoping when it gets cold again they'll go away once again.

I hated ants before, but now my hatred toward them has reached an all-time high.  I kill them like it's nothing.  I squish them, decapitate them, stomp on them, collect their dead bodies on my fingers, and on paper towels, suck them up with the vacuum cleaner, wash them down the drain, and watch them try to run away from certain death and laugh as they die under the pressure of my finger.  This is not the normal me.  I love all life.  Look, I'm a person who can't even kill a spider.  I always take them outside.  But ants are a different story.  They are a different kind of evil, and when you come into my house and disturb my peace you are messing with a different kind of Hana.

But now I don't know what to do.  Now that the rains have started, diatomaceous earth has lost it's power and I really don't feel like throwing away a bunch of Skipper's food every time the ants find it.  The Terro stuff doesn't really seem to work and the spray has minimal usage.  So now we are finally contemplating bringing in the big guns.  Maybe an exterminator?  Maybe buy a big bottle of the mean stuff at Home Depot?  I don't know.  What I do know is that I'm angry and frustrated and feel like killing millions of tiny... little... black... ants.

Saturday, October 13, 2012

The No 'Poo Diaries: Week 1

So it has finally come to this.  I started cleaning my toilet with it, then my laundry.  I haven't gotten to brushing my teeth with it yet, but I have now started washing my hair with good 'ole sodium bicarbonate, aka Baking Soda.  Come on, I know some of you were expecting this.  My crunchy granola-ness has finally taken me there.

Here it sits, ready to clean our hair.
For those of you unfamiliar with the No 'Poo phenomenon, it's basically the new hippy-dippy fad of washing your hair with baking soda and conditioning it with apple cider vinegar.  It supposedly helps your hair retain its natural moisture, aids in good scalp health, helps you avoid harsh chemicals that are often found in mainstream shampoos, and is more environmentally and financially friendly.

I've been hearing and reading about this for a little over a year now.  I was always curious about it, but was afraid to try.  Then my hair got long.  And dry, and angry, and split.  It was totally gross.  I don't cut my hair much, and it really shows after a year or so in between cuts.  So I cut it last week.  Then I decided that it would be a perfect time to start the No 'Poo challenge because it's nice and short and impossible to tangle.

Reading through testimonials of people who have done this resulted in, of course, mixed opinions.  Some said that their hair was gross for a while and took a few weeks to get used to the new routine, some had an easier time, some used a whole quarter cup of the miracle white powder, some used only a tablespoon.  Some used a cup of undiluted apple cider vinegar as conditioner, some diluted it and sprayed a bit on just before stepping out of the shower.

After reading several opinions, I gave it a try.  Here is the day to day breakdown of the first week.

Monday
I haven't washed my hair since Saturday afternoon, so it was nice and dirty and greasy.  I put 2 tablespoons of baking soda in a cup and took it into the shower with me.  I also filled a spray bottle with a 50% apple cider vinegar dilution.  In the shower, I added about 1/2 cup water to the baking soda and swished it around until it was well-mixed.  Then I poured it slowly on different areas of my scalp and rubbed it in.  Of course, it didn't get foamy and the bit that dripped into my mouth tasted awful.  But it felt good to massage my scalp with the baking soda since you can feel the exfoliating and scrubbing.  After rinsing it out, I spayed the apple cider vinegar all over my hair until it was "well-coated."  What does that mean?  I dunno, maybe 30 sprays.   I ran my fingers through my hair to untangle, and though it didn't feel anything like regular conditioner, it actually did the trick.  That rinsed out really easily and I was done.

Afterward, my hair didn't feel the same after I got out and while it was still wet, but it definitely didn't feel dirty anymore.  I let it air dry a bit and then blow dried.  This was the real test to see if the greasy-ness was gone.  And guess what?  It is!  It took a bit longer to dry, I don't know if there is something in regular conditioner that helps hair dry faster, but it took a bit longer.  My hair feels nice and soft, and clean.  And no vinegar smell.

Tuesday
This morning, it still looked clean, though it seemed a little flat.  It lasted the whole day and I was happy that it didn't look greasy all day.  I normally wash my hair every other day and I thought about washing it again, but decided to keep my normal routine to see how long the "cleanliness" lasted.  It still doesn't really feel the same, though I can't say it feels dirty.  Just a little heavier and maybe a little sticky.

Wednesday
I woke up to maybe some greasiness and the same flatness from yesterday.  I put it up halfway to hide the greasiness.  Throughout the day, it stayed about the same, and by the end of the day was looking like I hadn't washed it in 48 hours.  So I repeated the same washing process from Monday.  After I blow dried, my hair feels pretty great, and SUPER soft.

Thursday
It feels pretty much the same as on Tuesday.  Though what I noticed is that it is able to avoid bedhead.  My bangs sometimes look really scary in the morning, and they've been looking pretty good since I started this new regimen. 

Oooh, should this hair be in a Baking Soda commercial?
Friday
It's a day off for me, and since my house isn't heated during the day, I decided to take a nice hot shower to warm up.  This was my third baking soda hair washing, using the same process as the last two times.  I blow dried as usual, and this time I noticed it was a bit fuller than before, and felt a little cleaner.  It still feels great and looks good too.  Is this really going to be this easy?  What I've noticed today is that the smell from my old shampoo and conditioner is still lingering.  My hair still smells like the other stuff, even though it hasn't been used to wash my hair in a almost a whole week.  Crazy.  So maybe my hair is still hanging onto chemicals.  I wonder how long it'll take for all that to wash out?  Or does apple cider vinegar just smell really good when heated?  Who knows.  This is fun.

Saturday
This morning I woke up to fabulous hair.  I think this new fad is for realz.  Oh, did I mention Shawn is doing this too, and totally loving it?  Yeah!

Move over chemicals, Baking Soda and Vinegar to the rescue!

Trying to take a picture of your own hair sometimes results in awkward kitty photos.

Wednesday, October 10, 2012

I'm so silly...

I often refer back to my old posts for recipes.  I only share with you my absolute favorites, and since I don't write any of them down on real paper, I have to find them electronically.  Though it is nice to have my own online blog recipe book per se, I've always found it a bit of a pain in the ass to find the recipes.

Apparently, I had already thought about this conundrum and long ago added a search box to my home page for easy recipe searching.  The problem is, I totally forgot that I added this to my blog.  I've been frustrating myself regularly as I searched for certain recipes, just to have the easy tool sitting under my nose.  (Total face palm.)

Maybe you, my fabulous readers are already privy to this, but I thought I would give you all a heads up just in case you weren't.  So check it out, to the upper left of the page.  It's the little white box under the green letters, "Whatcha Looking For?"  Just type in some key words and posts with those words will magically appear.  Pretty cool.  I hope you find it useful.  I sure do.  I'm kind of an idiot sometimes.  :)

Maybe all this silliness is just rubbing off onto me from all the silly beings I live with.

Can you spot the creepy hand placement?


Sunday, October 7, 2012

Frannie's Baldness

Sad, naked belly.
For the last year or so, Frannie has been fighting feather loss.  She's always been kind of scraggly-looking, and she's never been one you could call fluffy.  She's tall and lanky, has an extra long neck, which kind of fits her slightly nervous yet aloof personality.  Her belly was always a little sparse and sometimes it was super red-looking and warm.

But this summer, she got extra naked.  She lost a lot of feathers around her butt and belly and we got a little nervous.  She hasn't really had a good molt in her life so I thought that's what it was at first, but it's taken a long time for her to grow them back.  We checked her over and over for mites or lice or fleas, but didn't find anything, and assumed that wasn't the problem since the other girls are fine. 

In contrast: Elsa's super fluffy belly.
So of course, the next course of action was to turn to the encyclopedia known as the internet.  The first piece of info I found was the whole red-belly thing.  There were several sources that said that when hens are ready to go broody and sit on eggs, they pluck some feathers on their belly and they get really red in anticipation of egg incubation.  Considering Frannie has always been very concerned with the comfort of her eggs, this made sense to me.

Some other opinions were contact dermatitis from her bedding, plucking by other hens in the flock, a fungal infection, and red mites.  I doubt it's plucking since she's chicken #2 and the area where the bareness is.  Unfortunately, there was a lot of discussion boards on the topic with very little answers; just a lot of people talking about it and suggesting possible solutions.  Basically, not super helpful stuff.

But since her feather loss spread to other parts of her body (neck and butt,) I researched molting.  Molting can take from one to six weeks, depending on the hen.  It could be that she did go through a molt, which made it worse, but that doesn't solve the original baldness problem.

Why Frannie?  Why?
So we still don't know what's causing it and what we can do to make it better.  She's acting like her usual self, but with fall and winter coming, I would like her to grow some feathers back to keep her warm.  We bought some meal worms for treats since protein helps in feather growth, and that did seem to help grow some back between her legs.  We also dusted her, their dust bathing areas, nesting boxes, and roosting pole with diatomaceous earth just in case there is a mite problem.

I'll keep you updated on our little lady.
Related Posts Plugin for WordPress, Blogger...