Tuesday, July 24, 2012

Surprise Jungle

My hard work has paid off.  All that time I spent planting seeds in pots and filling my greenhouse to the brim with seedlings, and building garden boxes amidst a wedding fast approaching, has paid off in the form of garden harvests and a backyard that looks like a jungle.

I haven't been able to do any Sunday Harvest posts yet, but some of the things that we've gotten include:

They stayed small because they were grown in pots.
*Arugula
*Zucchini
*Bok choi
*Green onions
*Lettuce
*Carrots


Just to think that I was preparing myself to not have a garden at all, but then getting completely different results is super satisfying.  There are some things that stayed in pots too long and got their growth stunted, but overall, everything is doing really well.

We've had one setback though: the ladies have figured out how to get out of their area and have eaten a bunch of my kale.  It's pretty sad.  I got mad.  So now they have no outside privileges and we have some serious incentive to build their permanent run.

Sad, sad naked kale.
Oh, and here's something cool.  I planted what I thought was a sugar pumpkin seed, and the plant is doing really well, but the resulting fruit is questionable.  It's colored like a zucchini, but shaped kind of like an elongated pumpkin.  My guess is that it is the offspring of a pumpkin/zucchini cross pollination.  I'm really interested in seeing what happens to it.  Will it turn orange?  Will it be edible?  How big will it get?  So exciting!

It's pretty big.
Here's something else that's cool.  For years, we have had a peach pit knocking around in our garden/compost pile.  It has made the rounds from worm bin to compost pile, from garden bed to chicken coop.  Somehow it followed us to the new place.  Since it's been around so long, we've been treating like a rock and ignoring it.  But for some reason, it liked its new digs so much that it germinated.  Both seeds in the pit sprouted to now we have baby peach trees.  They seem really happy, and we're kinda excited about this year's volunteers.

The peach twins.
Yay for gardens.  On a final note: I planted 15 tomato plants.  I hope I get so many I feel like I'm drowning in them.

Sunday, July 22, 2012

Chicken Coops: 3rd time's the charm

Moving is hard.  For anybody.  There were aspects of our move that made the whole process easier; the new place being only 7 minutes away, plus the major overlap in when we could move in to the new place and when we had to be out of the old place.  But there were also aspects that made the move more complicated, the biggest one being the chickens.

We were ready to move as soon as the wedding was over.  However, the ladies were not.  And they wouldn't be until we built them a new home.  I may have mentioned my stress about having to build a new coop (again), but thanks to my husband's major internet research skills we stumbled upon a coop plan that was free, simple, and easy to build.  It was exactly what we wanted.

Once we found the plan, I felt like half the job was already done.  This is also when I got excited because we're not carpenters, but this was a chance for us to build something legitimate to test out our skills.  I pored over the plans for several days, trying to figure out what materials we needed to purchase, including the tweaks that I decided were needed to build the coop to our specific needs.

The plan in its original form, resulted in a 4ft x 4ft coop.  I felt like it needed to be a tad larger so we decided to build a 4ft x 5ft coop instead.  We also put the nest box closer to the floor and cut the door in a different place.  We had some old shelving that my dad saved so we were going to use that for the flooring instead of plywood, and the roof pieces needed to be cut into different pieces than the plan to maximize efficiency in the usage of expensive plywood.  But other than that, we stuck to the plan pretty closely, which was pretty good since I have a habit of straying from plans.

Once I figured all that out, to Home Depot we went.  Our original purchase of all the lumber plus some corrugated roofing, hooks, and hinges equaled about $230.  Luckily we already had the above-mentioned flooring plus a bunch of nails and all the tools from my dad's supply.

Then it was time to measure twice, cut once, and start hammerin'.

First the frame needed to be built...
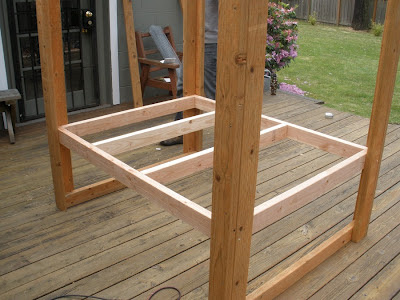
The frame: super easy construction.
...then we stapled some chicken wire to the bottom and three sides of the underneath run for predator-proofing purposes.  (See pics below.)

Then we decided to move it to its final resting spot in the back of the yard because carrying a heavy coop didn't seem fun.  This required a bit of leveling by digging down to lower one side.

The flooring was then nailed down, and then it was time to work on the walls.  The plywood was first cut into the correct pieces, then the holes for the door and nesting box was cut.  The plywood was then tacked into the frame with a bunch of nails.

Looking in from the back.

Nest boxes.
My brain worked overtime in figuring out the nesting box dimensions since I noticed there was a typo/miscalculation in the original plan.  But, I was able to figure it out and it came out nicely.

Then it was time to work on the roof.  I assembled most of it on my own since Shawn and my work schedules were hard to coordinate, so he had cut all the necessary pieces a day earlier to make it easy on me.  The plans result in a roof with a skylight so that the ladies will get as much daylight as is available which is a huge improvement from their last coop.

Unfortunately, I made the inside panels of the roof a bit too narrow, so when it came time to attaching it to the structure, we found that it was off by a half an inch.  So we had to take it apart to fix it.  It was a pain, but it had to be done, and proves that you can never measure something too many times. :)

Once the roof was fixed and attached, we were left with the final touches.  Hinges and doors, the roosting pole, the corrugated roofing, hooks, etc.

Painting is fun!
Then it was time to paint!!!  Luckily we had this super awesome barn red color left in the garage of the new place so we decided to go big or go home.  The white was leftover from my parents house so zero $ was spent on paint.  Our kid friends next door were super eager to help us out with the painting, which resulted in some paint ending up in random places.

We did have to take some emergency Home Depot trips for random extra supplies, so including those, the coop itself cost a total of about $280.  Pretty good for a nice coop, we think.

Our next step is to build the run.  For now, we have a very sketchy run that we put together using the old run we built for the babies last year and some random boards hammered together.  Building a run that is really predator proof is our next big project.  Until then, I'll have daily heart attacks as I worry about the ladies being eaten by racoons.

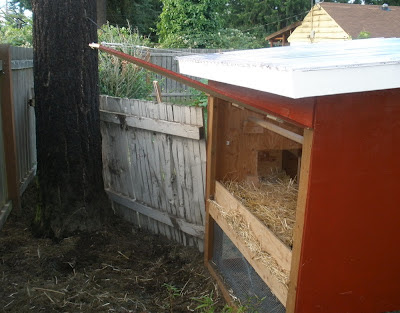
Here are some more pictures of our finished product:

Sky light from the top.
Sky light from the inside.
Back door closed.
Back door open.
The setup inside.
The set up outside.
We're pretty proud of the whole thing.  The ladies seem to like it too.

Friday, July 6, 2012

French Toast Waffles

Breakfast foods are a big deal around here.  At least one weekend morning, (and occasionally both mornings) we do it real-style: french toast/pancakes/waffles, eggs, sausage, potatoes, yum...  Waffles are the fave, since we use the Snoqualmie Falls waffle mix (super delish) and it's quick with very little cleanup. 

But then one day I thought: what if we combined waffles and french toast?

There are two ways to do this.  You can either french-toast-ify waffles, by battering and frying waffles like regular french toast, OR you can waffle-ize french toast, by putting a battered piece of bread in the waffle iron.  

Both are delicious.  You should try it.

Here is my basic french toast batter recipe in case you don't have one in your head:

2 eggs
1/2 cup milk
1 tsp cinnamon
1 tsp vanilla
1 tbs sugar
dash of salt

Whisk the cinnamon in with the eggs first.  This helps prevent the cinnamon from floating to the top and soaking only the first piece of bread leaving none for the rest.  Then add the milk and the rest of the ingredients.  Leaving this overnight in the fridge helps with the flavor if you have the foresight to make it in advance.  Also, depending on the staleness and hardiness of the bread you can leave it to soak in the batter overnight as well, though I haven't done much of that.

Now comes the frying part.  Use a little more oil than you think is necessary and keep the heat on medium.  This makes sure that the inside cooks enough before the outside is too brown, and helps in achieving the crispiness of the outside that is so necessary in french toast.

Top with butter and real maple syrup and you're on your way.  Add fruit, nuts, and whipped cream for a special treat if you deserve it.  I'm sure you do.

Have a great weekend everybody!

Waffled french toast.

Sunday, July 1, 2012

Goodbye Fun House

The last month has been a blur.  I finished up one job, started another seasonal one, road-tripped to a wedding, built a chicken coop, got married, and moved my whole life.  Life is still far from organized and settled, and we have a HUGE job ahead of us as far as the unpacking goes. 

But the end of June brought an end to my 5-year relationship with the Fun House.  The Fun House was the name that my family gave to the house that I lived in for the last 5 years, 3 of which involved my sister and then Shawn.  Yes, it was a fun house.  We had many adventures there, and even though the house itself left much to be desired, the atmosphere and the awesome backyard were worth the occasional troubles that we faced. 

Here are some of the things that the Fun House taught me:
* Gardening is therapy.  I can't live without it.
* Chickens are sweet, and do a great job of taking care of weeds.
* Fruit trees are fun, even funner if you make booze from them.
* Native trees and shurbs=native birds galore!
* Hardwood floors are AMAZING.
* Yard work is a lot of work, but worth the effort.
* Plants grow to be very big.  Spiky plants grow too.  No more spiky plants.
* Not moving for 5 years means accumulating lots of junk.

Since the last month has been so hectic, I've had little to no time to think about the fact that I would be giving up the place I called home for 5 years.  This is actually the first time that I've spent more than 5 minutes examining my feelings about it.  Today, we drove by the place and there was a huge U-Haul out front and the new people were already moving in.  There was a moment where I felt violated and jealous and protective, but I think I'm ok.  Our new place is pretty great, and we're making it even greater each day, so that has helped my emotional transition.

Even though we had a month to move, there were still some things that I had to leave behind:
* 2 Sunchoke plants
* A shit-ton of chicken crap compost. (We took some, but not enough.)
* 4 potato plants
* The garden plot with Mabel's ashes

Thinking about these makes me the most sad.  But there were lots things that we made sure to take, many of them thanks to my dad who made a last heroic effort to save:
* The raspberry plants (with ripening raspberries!)
* The vine maple tree that is now happily resting in the shade at our new place.
* Some chicken crap compost
* The garlic I planted last fall
* Firewood
* A rhubarb plant

Heck, the Fun House has been a pivotal character in this whole story of my life that I call a blog.  I wonder how its absence will effect this?

Goodbye wild flowers, goodbye sunflowers.

Goodbye Mabel, goodbye apple tree, goodbye weird garden ornaments.

Goodbye ferns, goodbye chicken run, goodbye pear tree.
 So goodbye Fun House, may the next people enjoy you as much as we did.
Related Posts Plugin for WordPress, Blogger...