Monday, October 31, 2011

Garden Minestrone Soup

For a long while, I was scared of soup.  It just intimidated me.  It's so good and there are so many different kinds out there, that I thought it was hard to make... until I started making it.  Now I know that soup is a dish that is very forgiving.  You can put anything into it, as long as you have the same basic base.  (Either a good meat stock or the golden trio of carrots, onion, and celery.)

The cooling weather outside made me want something warm and cozy for dinner.  What better than soup?  Naturally, the first thing I looked for was stuff lying around from my garden that could go into it. The more I looked, the more I found, and pretty soon, over half of what made up the soup came from my backyard soil:

Garden bounty!!!
* Onions
* Carrots
* Kale
* Potatoes
* Oregano
* Green Beans

The rest of the ingredients include: several stalks of celery (the core that no one wants to eat is really good for this purpose), a cube of vegetable bullion, a couple cloves of garlic, salt and pepper, basil, a can of pinto beans, a handful of pasta, and a jar of marinara/tomato sauce. (The box of pasta is a sample that I got from vegfest, it was the perfect amount :))

Start by sauteing the onion in some olive oil in a soup pot until transparent.  Add the garlic, celery and carrots (chopped) and saute for a couple minutes.  Dissolve the bullion cube in 4 cups of boiling water.  Add the water to the pot with the potatoes.  Bring to a light boil and add the rest of the ingredients.  Let it get back to a simmer and add the salt and pepper to taste, and the herbs. 

I've found that the thing with soup is to let it simmer (covered) for a long time.  The longer the flavors are able to mesh together in the pot, the tastier the soup will be.  I think this pot was able to cook together for 4 hours.  Serve with some delicious crusty bread and enjoy!  We enjoyed it in front of our first fire of the season in the wood stove.  Cozy and delicious!

I didn't have time to bake the bread myself, but if I had, that would have been the ultimate.

Tuesday, October 25, 2011

Go Play Outside!

As the weather takes a decline here in the Pacific Northwest, it's easy to get caught up in the feeling of the crappy, dreary weather and become somewhat cabin fevered.  The days get shorter, temperatures cooler, and the precipitation is set to a constant drizzle.  The two months of beautiful Summer Seattle bliss results in forgetting that rain is just water and that it won't hurt to get some on your head. 

I go through this every year.  But, after a couple weeks in hiding and denial that summer is over, the changing leaves help me appreciate how beautiful fall can be around here and I muster up the energy to go outside.  The fall and winter clothes replace the summer ones and I bundle up a little too much in anticipation for the chill as I step outside.  (But really, it's not that cold yet.)

Summer gardening is awesome.  It's a great reason so soak up the Vitamin D and grow delicious food in the abundant sun that we (usually) get here.  (People don't believe that, for some reason.)  But fall offers some great opportunities to get outside, and who are we to deny these offerings because of a little rain and cooler temperatures?

The first thing everyone should do in the fall when the days start getting short is plant garlic.  I've heard that you plant garlic on the shortest day of the year and harvest it on the longest, but I don't know about the actual validity in that.  Naturally, I don't follow rules so I planted some last week, assuming that as long as it's planted in the fall it'll be happy.  I got a head from the farmer's market, divided up the cloves (ten cloves total) and planted them in unfertilized soil.  I also read that you fertilize them in the early spring.  The act of turning the soil in that small patch, coming in contact with some wriggly worms, and watching the cloves disappear under the magical brown stuff was awesomely therapeutic after being inside in front of my laptop for the last several weeks.

Another outside fall task is the breaking down of the summer garden and saving seeds for next year.  I let some of the peas and green beans get really mature and slowly, but surely, the pods are drying out (in this rain it'll take forever) and I am able to harvest the seeds.  I've been using the greenhouse for this drying process and it's working ok.  The broccoli seed pods are still green but I'm checking those all the time.  Shawn and I wrestled the 8ft sunflower stalks into the yard waste bin yesterday, and replanted a vine maple tree that has been suffocating in a pot for too long in their place.

The last of the tomatoes on the vine are also going into the greenhouse to turn their bashful orange blush into a full outright red.  It's working surprisingly well.  (And you already know what we do with the green ones.)

A fair amount of weeding and reseeding of the lawn happened in Sunday in the nice fall sun and our front yard looks better than it has all summer.  If it was up to me, I would just tear the stupid lawn out and replace it with a bunch of native plants and stuff, but since this is a rental, I have to keep the landlord happy and maintain it. 

So there you go.  Fall is not to be feared.  It should be embraced and each day that it doesn't rain taken advantage of.  We've got a long winter of cold and wet ahead of us, so go play outside while you still can!

Monday, October 24, 2011

Seattle Authors

The last two books I've read were both written by Seattle authors.  Since they were both quite enjoyable and are related to the idea of homesteading and urban living, I'm going to review them both!

Crow Planet
by Lyanda Lynn Haupt

Some of you are aware of my fascination with crows.  They are totally wicked cool.  They're super intelligent, they have really complex relationships with their fellow corvid mates, and they can be really fun to watch.  I've loved them for a while now despite a lot of anti-crow remarks that you hear all the time. (Rats with wings, they're really mean, etc.)  This book is about naturalizing.  Naturalizing is beasically what it sounds like; studying nature in depth.  Naturalizing generally happens in really "natural" surroundings, forests, meadows, beaches, etc.  But this book talks about naturalizing in urban spaces... Seattle to be exact.

Haupt mentions that not a day goes by without at least one encounter with a crow.  Whether there's actually interaction or not, crows are there to be seen every day.  They are a constant reminder of the natural world, though we have begun to count them apart from nature due to their constant presence.  She talks about how the population growth of crows has mirrored the population growth of humans over the centuries and that we are the reason there are so many.  They can adapt to our habitats, whereas many other creatures cannot, ergo, more crows.  The book is a good reminder of our relationship with nature and how responsible we are of the changes we see to our surroundings.  Three out of four eggs for this one. 


Farm City
by Novella Carpenter

Oh boy did I love this book.  Shawn couldn't even put it down and that's saying a lot because he is a serial book non-finisher.  This is a book about a lady with some serious balls who moved from Seattle to Oakland (the armpit of the west coast) and created an urban farm in an abandoned lot next to her apartment.  The characters in this book are hilarious, from Bobby, the homeless man that lives in cars on their street, to Lana, her art-loving neighbor, to Cornrows Boy who comes by to adopt a rabbit, and Chris, the fancy chef who she meets while dumpster diving in his restaurant, who teaches her how to make salami with her pigs.

She started with a garden and box of bees, moved on to chickens, ducks, turkeys, rabbits, then eventually, pigs.  She's a serious homesteader and serious DIY'er.  She is just like me, except times ten.  I think I enjoyed the book so much because everything she did, I would totally do... if I had the guts.  She likes to make stuff out of junk and dumpster-dived regularly for food for her livestock.  She went through the terrors and eventual pride of butchering her own food (all except the pigs) and the stress of living in Oakland, surrounded by prostitutes, gangs, bums, and several instances of dogs coming in to kill her livestock.  I wish I could be just like her.  I probably won't, but this book inspires me to do more and not be afraid of things.  She is why I want to write a book myself.  Four out of four eggs... it's that good.


Saturday, October 22, 2011

Integration Complete!

Though not completely harmonious as of yet, the babies have officially moved in to their permanent quarters.  Frannie is totally fine with it, though Abby still has yet to let them hang out in the run.  But I can confidently say that the babies are moved in and it will all be ok.  Honestly, it feels so good to say that because for a little while there I thought it was going to be hopeless and that we were going to have to eat Abby.  But Abby saved herself by accepting the fact that these new additions are here to stay.

Since I wrote about it last, we went through a couple more stages of integration where I isolated the two groups in separate parts of the run and coop and also allowed them to be together unsupervised for an hour or so at a time.  I was nervous about the unsupervised time together but I shouldn't have been.  Abby did bully them a bit, but the babies are full grown now and the coop is big enough to allow for space for them to get away.

Don't get me wrong.  The two groups are not friends.  Well, Abby at least isn't and will likely never be friendly with Pearl and Elsa.  But Frannie is when Abby isn't looking so it's ok.  Knowing the integration is complete is a huge weight lifted off my shoulders!

And Pearl is going to lay any day now... so excited!

Secret buddies.

Friday, October 21, 2011

Garden Curry Rice

Curry rice is pretty much the equivalent of spaghetti in Japan.  It's quick, all kids will eat it and it's a full meal in one dish.  It's easy to make because you can get all the flavoring in cube form at any slightly diverse grocery store.  (We get them at central market.)  Yes, it is cheating a little bit, but it still requires some cooking and makes cooking dinner at home super easy.  Better than eating out, dontcha think?

We make a batch of it every few months (and eat on it for a couple days since it is physically impossible for my sis and I to make a small batch of the stuff.)  The reason I'm writing about it this time is because our most recent batch included a ton of ingredients from our garden.  Trust me, it made everything taste better.

All from my garden.  Yum!
The label even says it's tasty.
Ingredients:
*One box Japanese curry cubes
*Potatoes
*Onions
*Carrots
*Protein (Chicken, Beef, Tofu, etc.)
*Whatever else you want in it... we often use sweet potato, kabocha squash, mushrooms, broccoli, and peas.  (Not all at once though, you have to restrict yourself somewhere.)

Ok, chop up all the stuff into bite size cubes.  Take a large stew pot and add a couple tablespoons of cooking oil (olive or vegetable) and saute the onions for a bit.  If you have beef or chicken this is a good time to cook them as well with the onions.  The tofu can wait till later.

Once the onions are cooked through, add 6-8 cups of water and the vegetables that need thorough cooking (like the carrots and potatoes).  Let the water almost come to a boil and add the curry cubes.  I like to chop the cubes up a bit before adding them to help them dissolve but they can just be tossed in as well.  Stir until the cubes are mixed in and let simmer on low for about 10 minutes.

Add the rest of your ingredients and cook until they're cooked through.  The longer this curry sits the tastier it will be, so if you have the time to start early, do it and let the curry just sit around on low heat for a few hours.  Serve over hot rice and enjoy!  There will most likely be leftovers, which in my opinion tastes better than the first time around. 

Usually there's more stuff but this was the bottom of the pot.


Thursday, October 20, 2011

Struggling with Mediocrity...

For several years, I've gone through life with a nagging dream in the back of my mind.  A dream that involves me doing what I love and making a living off of it.  More specifically, creating beautiful things that people would want to purchase to make their own lives a little more beautiful and pleasant.  These beautiful things would be knitted, constructed, sewed, or whatever... by me. 

I'm sure most of you can tell, I like doing things and creating with my hands.  I've always loved hand-making cards for people, knitting soft warm snuggly things, baking yummy desserts, and so on and so forth.  And I think I'm generally pretty good at these things. 

What I struggle with is finding that one thing that I can do so well that it is worth something to other people.  I look around on Etsy and craft shows and such and every one of the artists has their niche.  They are really amazing at their one thing.  It's awe-inspiring to look at what each of these craftswomen who are able to do what they love and get paid for it.  (At least I assume they get paid for it, they charge enough...)  All I can say is, I WANT TO DO THAT!

But how?  I often feel as though I am the jack of all trades who is the master of nothing.  Ask me to knit something and it's done.  Wedding stationery?  Easy peasy.  Block printing?  Love it.  Paint a picture? No problem.  Want to eat something delicous?  Me too.  But what the heck?  I have yet to find the one thing that is different than what someone else is already doing.  

I think it's pretty near impossible.  Bummer.

I'm gonna keep trying anyway. 


I wrote this a couple weeks back when I was feeling particularly down on myself.  Since then I've opened an Etsy account.  (I haven't put anything up on it since the giant-ass rules and regulation page scared me off, but at least I'm one step closer.)

I've also realized that all those people who are able to make a living off of their arts and crafts have probably put in a ton of time and money into starting their business... ie, have taken giant risks.  I'm generally not a risk taker.  I'll have to get over that if I want to make my dream a reality.

I'm also thinking about writing a book.  That's all I'm going to say because I don't want to say anymore and get myself and anyone else excited about something that might not happen.  But it's in my head and I've started the preliminary stages of writing.  I hope it works out. 


Monday, October 17, 2011

Makin' Paper

One of the tasks I've taken on for this whole wedding thing is to make my own stationery for the various cards and such that are required to let people know stuff.  You've seen the STD's (no, not those STDs silly, save the dates), but now that those are all sent out, it's time to start thinking about the invites.  Most of those will go out in February or March, but since I have free time now and would like it to be taken away in the near future by a full time job, I'm working on them now.

These will be particularly time-consuming since I'm making the paper for the main part of the invite. 

Paper-making is relatively easy... as long as you have a paper-making kit.  Luckily, I do.

A paper-making kit usually includes a deckle (the wooden frame) some blotter paper, and a screen.  That's pretty much it.  You will also need a towel, a clean sponge, rolling pin, some shredded paper, and a crappy blender.

First, you put a couple handfulls of shredded paper (in our case bank statements, etc.) into the blender.  I added some small pieces of yellow construction paper to add warmer color to the paper, since using just the shredded paper results in a grayish colored paper.  Add some water and blend for about a minute or until there are no more chunks.

It should look about like this.  It'll look gray, but when it dries, it lightens up a lot.

I would also suggest adding a bit of fun like flower petals (these are just the usual colors that can be found in my front yard) or moss or whatever you feel like might look nice in the paper.  This you only have to blend for a few seconds so add it at the end.

Now fill your sink with water so that when the deckle is placed in it, the water reaches about an inch from the top.  (The deckle should be placed so that the side with the attached mesh is on the bottom and the frame placed on top.) Pour some of the pulp mixture into the deckle.  The thickness of the paper will be based on how much you pour in so you'll have to do a couple tests out to figure out the ideal amount.  You then will want to use something thin like a skewer to make sure that the pulp is distributed evenly in the deckle.  (You don't want some areas of the paper thicker than others.)

Holding both side firmly, lift the deckle straight out of the water and let drain for a few seconds.  Lift the top frame off.  Place your extra sheet of mesh on the pulp, and using a sponge, gently soak up some of the water.

Peel the mesh off so the sheet comes with it and place it on a dry towel, paper side up.  This can be tricky, but gravity can help you out a bit.

Place a blotter sheet on top and roll over firmly with a rolling pin.

Peel the blotter and paper off of the mesh.  This should be easy since the paper will stick to the blotter paper.  Place it paper side up.

Put another sheet of blotter paper on top and roll over with a rolling pin once again.

Carefully peel off the paper from the blotter sheet, making sure not to tear or stretch the paper.  At this point the paper is relatively dry so it should come off in one piece pretty easily.

Let air dry for a day or two.  I usually get 5-7 sheets per blender-full of pulp.  You can experiment with all kinds of stuff and different colored paper.  Some of the things I added to these batches were moss, flower petals, leftover tea leaves, and chicken feathers.  All were a success except the feathers.  They just don't cooperate.

Pretty cool that unwanted bank statements can be turned into something beautiful huh?

Sunday, October 16, 2011

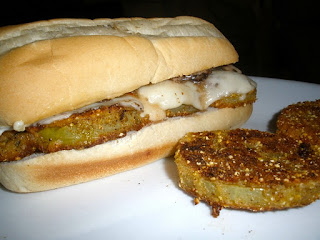
Fried Green Tomato Sandwiches

This is Seattle.  Guess what that means?  Lots of green tomatoes to eat in the beginning of fall.  I've never had fried green tomatoes before, but thanks to Zack, Als' BF from Florida, we got to eat them today.  Though I did not make these, I figured I would write about them because they were delicious and something that every Seattle gardener should do with their bounty of green tomatoes.  (And next time I can make 'em.)


First, slice them up about 1/4-1/2 inch thick or less.  To make the breading, mix corn meal, flour and bread crumbs with some parmesan cheese, seasonings, and salt & pepper to taste.  Dredge the tomato slices in flour, then an egg wash, then coat with the corn meal mixture.  Pan fry them on medium heat until brown.

In the meantime, slice some mushrooms up and saute in a little olive oil and some minced garlic.  Assemble the sandwiches by placing the fried tomatoes on some hoagie rolls and top with mozzarella cheese.  Broil for a minute to melt the cheese and top with mushrooms.  Add some honey mustard and cock sauce (Sriracha hot sauce) and enjoy!  Mmmmm...


Monday, October 10, 2011

Makin' Hard Apple Cider!

Here it is folks!  I took our footage we got from this weekend's cider making extravaganza and made an easy-to-watch video.  The weather was perfect, everybody had a great time, it was just a perfect fall day.  Enjoy!


The words are a little too small to read when viewed small, but blogger made the quality too crappy to view full screen.  I've uploaded it onto YouTube so you can watch it here.

To see part 2, click here.

Sunday, October 9, 2011

Sunday Harvest

This might be the last Sunday harvest post in a while.  Now that the official growing season is kaput, we're not getting stuff regularly.  So I'll post these when I do get stuff.

This week's word: APPLES.  And yes, we made cider.  I'm making a video about it so this picture will just have to be a little taste of what's to come.  Stay tuned!

75 pounds, maybe?  Either way, a lot.

Friday, October 7, 2011

Happy Blog Day!

Today marks the one year anniversary of my embarking on the journey of blogging!  Not only have I kept up with it, but it's become an important part of my life.  I'm always thinking about new projects I can do and share with you all and this has lead me to be more motivated and productive with my time, especially at a time like I'm going through now which allows me nothing but time to use.

So thanks, everybody for being my loyal readers.  Whether you've been there from the start or jumped on later, I appreciate each and every one of you.  It's been a complete pleasure to share my stories and experiences in hobby homesteading and I just hope that there has been something on here that has made you smile or has helped you with your own projects in some way.  I hope to keep going and trying out new things and sharing them with you.

Much Love,

Hana

P.S.  Haven't posted a picture of Nikolai in a while...

He was hanging out like this for a while.

Thursday, October 6, 2011

Bubba Gump Apples

Apple crisp, apple pie, apple sauce, apple cider... I feel like a Bubba Gump with all the apples we have up in here!

So I told you folks about the apple crisp I made last week from our backyard apples that fell during the windstorm.  Well, they're falling off the tree with little more that a light breeze these days, so we're taking that to mean that these apples are ready for picking!  Shawn got up on the roof of the party shack and we picked some good ones from there.  We'll still need to borrow my dad's tall ladder to get up to the ones higher up, but we got a good 40 pounds or so with just this attempt.

The really good ones we saved in a separate bucket for good eatin'.

Most of them had evidence of bugs getting inside so I cut them open right there as Shawn tossed them down to me and I did a quick quality inspection and chucked the really bad ones into the compost.  The ok ones I cored and the buggy parts cut out and saved in a bowl.  Once I got a good ten pounds of these, I washed them and Shawn and I peeled them.  A majority of them were cubed and went into my big stainless steel pot to be turned into apple sauce.  Into a separate bowl went some other ones that were sliced for apple pie.

I'll give you my recipes for both of these, but for both, I didn't follow any recipe myself, let alone measure much so these quantities are best guesses.  Sorry.

Good Ol' Home Made Apple Pie
(Ever had an apple pie from a store that sucked?  You know the kinds with the gelatinous goo that surrounds the undercooked still slightly crispy apples?  Well making your own apple pie at home will help you realize how inferior those pies really are!)

The last slice...
Ingredients
8-10 apples, peeled, cored, and sliced thinly
1/2 cup sugar
2 tbs agave syrup (I've been putting this shit in everything!  It's my new fav sweetener.)
2 tbs flour
1 tbs lemon juice
1 1/2 tsp cinnamon

Mix above ingredients together.  Prepare two pie crusts.  Fill pie pan with apple mixture and top with second pie crust.  Crimp edges together and make sure to slice a couple air holes in the top.  Top with a nice sprinkling of cinnamon sugar and put into preheated 350 degree oven.  Bake for 45 minutes or until some bubbles of deliciousness start showing from your air holes.  Serve warm with ice cream for a dessert or chilled with a cup of coffee for breakfast.  Delish!

Grandma's Apple Sauce
(Much like apple pies, I don't really like store bought apple sauce because it reminds me of wet sawdust.  This applesauce is chunky, with a touch of cinnamon, just like my grandma always has with dinner at her house.  I know most of you haven't had dinner at my grandma's house but trust me, it's always awesome.)

Ingredients
5 pounds of apples peeled, cored, and cubed
1/2 cup white sugar (or to taste)
1/2 cup brown sugar
1/4 cup agave syrup (here it is again!)
1 tbs lemon juice
5 cups water

Canning Stuff
Mason jars with lids and rings (All washed and sanitized)
Large stockpot that will hold the mason jars
Tongs to grab hot jars and stuff
Funnel (optional, I made one out of the top of a bottle of lemon juice.)

Wash the jars, lids, and rings in a dishwasher or in hot soapy water.  Fill the larger stock pot with water and place it on the stove to heat up till hot, but not boiling.  Add the mason jars before the water gets too hot and have them wait there while the apple sauce is made.  As far as how many mason jars to have ready, just guess and prepare one or two more jars than you might need just in case you guessed wrong.

Put all the ingredients into your other large soup pot.  The water amount is really a guess, you just need enough to bring the water level up to just below the level as the amount of apples you have.  Put it on medium heat, stirring occasionally.  Once the apples heat up and start cooking down, stir them more.  This will break them down little by little so you have a sauce and not justa bunch of soggy apple bits.  Once the apple mixture has boiled for a little bit and is the consistency you like, it's time to start canning.

Get your tongs ready.  Pull out a jar and fill it quickly with sauce (using the funnel like in the pic or not.)  It's generally a less messy procedure with one.  Fill the jar to a 1/2 inch from the top and quickly screw on the lid and the ring.  Put it back into your large pot with the hot water.

Fill the rest of the jars until you have no more sauce and place them all into the large pot to process.  The water level in this pot should be an inch over the top of the jars, but mine's not like that because I like to break rules.  Do as I say, not as I do, folks.

Process (or boil) those jars for 15 minutes, then gently lift them out to cool and wait for the familiar "plink!" as your jars seal in the goodness.  If done correctly, these jars should last in a cool dry place for 2 years or so.

And yes, I did mention apple cider at the beginning of this post.  That is for next time...

Wednesday, October 5, 2011

Garden 2011 Recap

Fall is officially here and the garden is pretty much toast.  We're still getting some stuff in, (kale, hopefully another batch of green peas, carrots, onions, and sunchokes) but the now that the sun has begun its 8-month hibernation period, nothing is going to keep growing.  I think the jalapeno plant is trying to have more babies because all of a sudden there are 6 or 7 flowers on the plant.  I'm going to bring the plant inside and try to hand pollinate the flowers to see if we get any more fruit.

Anyway, I thought I would recap the season to help me figure out what next season will entail.

The Success list:
*Peas.  Did I mention they were seeds I got at Goodwill?
*Carrots.  I was skeptical at first but they did well in the end.
*Kale.
*Tomatoes.  Never though I'd say that.
*Lettuce.
*Rhubarb.  Not that I had to do anything :)
*Zucchini.  As usual.
*Potatoes.
*Onions.
*Shiso. Started late but got a good harvest anyway.

The Decent list.
*Green beans.  Usually these do so well, kinda disappointed.
*Cucumbers. 
*Cabbage.  Barely.
*Kabocha.  Also barely.
*Sugar pumpkin.  Last year's seeds so I'm not surprised.
*The sunflowers.  They were a huge success, but I let the squirrels have them all.

The FAIL list.
*Cauliflower.  We didn't get ANY :(  Never again.
*Broccoli.  We got some, but not nearly close to what we got last year.  I blame the aphids.
*Cantaloupe.  Possibly a weather problem.
*Raspberries.  They're only two years old so I'm not surprised.

So there you have it.

Tuesday, October 4, 2011

Harvestin' 'Taters (Sunday Harvest)

This week, we harvested our potatoes.  There were a couple other areas in the garden where I planted some or where they came up as volunteers and we harvested those a while back.  This was the official harvest of the big batch that we planted in a separate bed near the sunchokes. 

Last year, I harvested the potatoes too early and they were still a little small.  I really couldn't help it, digging for potatoes is by far the funnest harvest because it's like digging for treasures.  This year, I planted them extra early and waited for the plants to be absolutely, positively D-E-D dead before digging anything up.  And it was a HUGE success. 

Not only did we get nearly 10 pounds, but some of these red potatoes were the size of enormous russets.  It was really fun.  I saved the smaller ones and I have to figure out the best way to store them so I can replant them for next year's crop.

As for the rest of the stuff this week, the tomatoes are still trickling in and I found out I waited too long to harvest the one cabbage we had left.  It was starting to get eaten by the various decomposers in the garden and I had to cut a bunch of it off to keep the good parts.  The chickens didn't complain.

I picked the kabocha squash since the plant that was attached to it was dead as well, and also some shiso leaves.  I tried salting them but it didn't work and I had to throw them out.  Luckily we have more, so sushi or shiso pesto may be in order.
Related Posts Plugin for WordPress, Blogger...