Showing posts with label Preserving. Show all posts

Sunday, November 23, 2014

SAUERKRAUT!!!

We grew cabbage this year. Despite all the aphid killing I had to do (though spraying aphids with the hose on the jet setting is surprisingly cathartic,) we got some pretty nice looking heads. They weren't very tasty, however. They were kinda hard and kinda over-crunchy, and kinda tough. Not delicious enough to eat straight up. I made cabbage soup out of one head, which was good, but decided something else was in order.

Sauerkraut!!!

I Googled some tips and decided to keep the operation small, (I only had two smallish heads) and go with the mason jar method.

You guys, this is so easy.

First I spent about 30 minutes chopping cabbage into kraut-sized pieces... so, small. Of course, as I was just finishing up and congratulating myself on not injuring any of my phalanges, I cut off the edge of my fingernail. No blood, but a nice dose of adrenaline, that's for sure.

Next came the fun part. I put all the shredded cabbage, about 8 cups of it, into a large bowl, sprinkled about 2 teaspoons of sea salt over it and started kneading and massaging the hell out of it. Actually, the whole point is to massage the moisture out of it so it has a brine to soak in. After about 10 minutes of sweet sweet massage, it packed it into two large, sanitized  mason jars. Even after packing it really well, I still didn't have enough liquid to cover the cabbage, so I made some more brine with water and sea salt and poured it into the jars.

I covered the jars with a wash rag secured by a rubber band, and left them to sit on the counter to get their "sauer" on. I read that there was a chance that stuff could grow on the top and things could start looking funky, so I was a bit nervous. For the first few days, there was some serious fermenting going on, because a lot of air bubbles would collect in the jars around the shredded cabbage. To remedy this, I would just use a spoon to pack the cabbage down into the brine a couple times a day to squeeze the bubbles out.

After about 4 days, the bubbling stopped. At a week, we tasted it. It smelled like slightly sour cabbage, and tasted pretty much the same. It was starting to get sour but was more salty. So it stayed on the counter. We tasted it again about 5 days later, and it was better, but not quite. So it stayed on the counter for about 2 1/2 weeks total.

And you know what? No funkyness. Ever. The color of the cabbage got a little darker, the green-ness went away, and the flavor just came gradually.

Such an easy way to make the summer harvest last a little longer.

Time to get me some brats.

When packed together, I ended up with a whole mason jar of sauerkraut.

Tuesday, May 27, 2014

Freezin' Greens

My garden is off to a rockin' start this year. We harvested a bunch of our own chicken crap compost and got stuff into the ground in April. The hoop house is keeping the tomato plants warm, and everything is coming up nicely and growing really well.

One of this best things we've got is the spinach. It's doing so great, we actually can't keep up with it. I harvested some last week, but the perfect spring weather and sprinkles of rain have made it get a bit out of control. So I spent an hour today picking and prepping it for the freezer.

Here is the patch before:


And after (enough to get more next week, I'm sure):


This is how much I got. This is a big bowl.


I took about two thirds of it and ripped it into smaller pieces after rinsing it really well and stuffed it into a one gallon Ziploc bag and sucked most of the air out. I always put a handful of spinach in pasta sauce, soups, and a lot of other things for the extra bit of nutrients so this bag will be handy for that.

The rest of it I food processed with about a 1/4 cup of water and put them in ice cube trays. Once frozen, I'll pop them out of the trays and keep them in another container so they don't get freezer burned. These will be good for smoothies and... baby food! Our little monster is going to be starting solid foods in a few months, and what's better than fresh food from the garden? We'll probably mix these with some sweet potato or something for some delicious, cheap veggies for Eddy. 

Both Shawn and are excited for the whole fresh food prepping that we'll do for baby once she starts eating real food. None of that yucky tasteless Gerber stuff for our little one! Food is a big deal for us so we want to expose her to lots of different foods from the get-go so that she can have her life enhanced by all the flavors the world has to offer.


Garden 2014 is looking like it might be pretty awesome!

Wednesday, October 24, 2012

Oven-Dried Tomatoes!

Dude, don't you love sun dried tomatoes?  I sure do.  But why are they so expensive?  I'll tell you why: because they take forever to dry!

After weeks of stressing over whether I was going to get any tomatoes this year, my wishes were rewarded with pounds of little tomatoes thanks to the extended summer we had.  We ate a bunch of them but we're still getting them.  And to be honest, I'm not a huge fan of a straight tomato.  So eating them as is is not something I can do easily. 

Since my counter and 'fridge was getting over-run with them, I really needed to do something about it.  I already have three large jars of canned tomatoes from the canning party my family had late in the summer so I didn't feel like I needed more.  Then I had an epiphany: sun dried tomatoes!

But the sun is gone, so the oven did the trick.  I made two batches.  Here's the process:

I started with my heirloom tomatoes that I grew from seed that I saved last year.  These tomatoes aren't very big, aren't very lumpy like normal heirlooms, and come in various sizes.  I had ones that were as big as a roma, down to ones just larger than a cherry. 

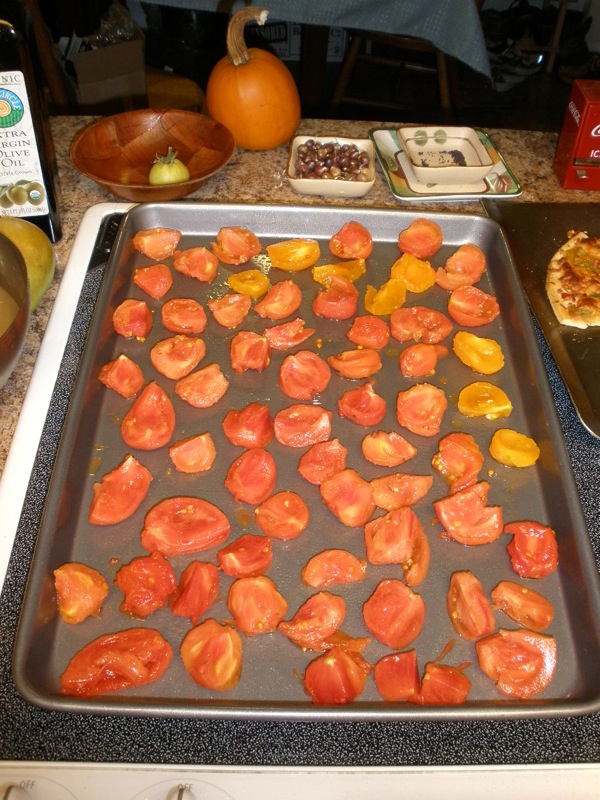
So for the first batch, I just cut them into quarters or halves.  I cut out the green cores where the stems were and gave them a little squeeze to get out any extra juice and seeds.  Then I arranged them onto a wire cooling rack and a cookie sheet sprayed with a little olive oil.

For the next batch, I peeled the tomatoes using the quick boiling method.  (Boil the tomatoes for 45 seconds, then put them into an ice bath.  The skins will then peel easily.)  Then I did the same.  Cut, core, squeeze, and arrange onto a cookie sheet.  Here is what the peeled ones looked like:


I then put all the trays into an oven heated to 200 degrees.  I was a little worried that 200 degrees would be too high, but I think it was perfect.  I checked on them after a few hours and they were still pretty soggy. 

BEFORE: Skins on top, naked ones on the bottom.
After 4 hours, I had to go to bed, so I turned off the oven and just left the tomatoes in the oven.  I then woke up the next morning and just turned the oven back on and gave it another 5 hours.  I decided they were finished when they weren't quite crispy, but more rubbery.

And AFTER!
So shriveled...
I kept the two batches separated and ended up with probably 2 cups worth.  I put them in baggies and sucked out as much air as I could with a straw.  Into the freezer they went and are ready for use!

*I actually used them tonight and mixed them in with some brown butter sage sauce with chantrelles to put over butternust squash ravioli, and it was delicious.  So much good tomato flavor!  I guess it makes sense that when you take all the water out of a tomato, you're just left with pure flavor!  I think this was a pretty smart use of my tomatoes that I will be enjoying for a while.
Related Posts Plugin for WordPress, Blogger...