Saturday, April 30, 2011

Watch out! Here it comes!

Our first harvest of the year is just around the corner: Rhubarb!

Every spring and summer, we get an insane amount of it.  In the last two years, we've made two batches of strawberry rhubarb jam and probably over a dozen rhubarb (insert your favorite berry or fruit here) crisps and cobblers.  And that's not including what happens to the stalks that we give away readily.

I wasn't a huge fan of rhubarb growing up, the feeling of "celery" in my mouth when I was supposed to be eating pie was weird.  But, its insistence on being in my face and trying to take over the garden has forced me to cook with it, and now I love it.

It freezes well too.  I just leave it as stalks, stack them nicely in a plastic bag, and throw 'em in the back of the freezer.  They thaw a little mushy, but mushy means no "celery" in my desserts.  You just have to chop them while they're still a little frozen to avoid mush on your cutting board.

The rhubarb seems to love the sad excuse for spring weather that we've been having because it's flourishing.  The stalks are super thick and the leaves are HUGE.  (The chickens like a snack of it too, don't worry, it doesn't seem to be poisonous to them.)  Seeing it going crazy like this reminded me that I still had a few pounds of it left in the freezer from last year, right next to a pint of blackberries that we picked at the end of the summer.  I knew just what to do...

It's Blackberry Rhubarb Crisp time!

Here's my tried and true recipe that's super easy to memorize:

The Fruit Part:
4 cups blackberries
4 stalks rhubarb
one cup of sugar
1/4 cup of instant tapioca


For the crumble/crisp topping:
1/3 cup flour
3/4 cup oats
1/2 stick of butter
1/4 cup brown sugar

Mix up the fruit ingredients and crumble ingredients separately.  You'll want to mix the fruit ingredients and let them sit for about 30 minutes to make the tapioca happy.  This also brings out all the bright red juices.  Preheat the oven to 375 degrees.  Pour the fruit into a 13x9 baking dish and top with the crumble topping.  I don't actually know how long I baked this for, maybe 25-30 minutes.  I usually just wait until all the edges are bubbling nicely and the delicious smell of the fruit permeates the house.

Now here's the hard part: you have to wait till it cools a bit before you dig in, for danger of scalding your whole mouth with the hot molten magma that is your crisp.  I promise, it's worth the wait.  And, waiting for it to cool a bit will also prevent your ice cream that you put on top to melt too quickly.  Oh, did I forget to mention ice cream?  Sorry.  Vanilla is the best, but I bet other flavors are delicious too. 


 It's just a matter of time before jam will be in the making... (since I just bought a pint of terrible strawberries.  Duh Hana, it's not quite strawberry season yet.)

(There would be a picture of the cobbler with a scoop of ice cream in top, but we ate it all and forgot to take a picture of it. Instead, this one will have to do...)

Thinkin' about taking a nibble...

Oh, and it looks like we've decided on our chick breeds, and according to the chick calendar at the feed store, May 13th should be their due date.  I can't wait!

Tuesday, April 26, 2011

Like Goodwill? Try the ReStore!

(Photo from Future Seattle Innovation Now blog)
The ReStore is one of my favorite stores.  I like it almost as much as Goodwill.  They sell used building materials that are donated by the public or salvaged from various demolition  and construction sites.  They're pretty much doing more than their part to save the planet by reducing the amount of crap that goes into the landfill.  AND, they have so much cool stuff. 

Like any thrift store, they have a ton of junk crammed into an area too small for it all, but they make up for the clutter by storing gems here and there.  They have really old looking chairs, light fixtures, stoves, doorknobs, etc. that could be considered antiques, and also have lots of ideas on how to use random household objects for other uses than their initially intended purpose.  Walking through the store just gets my creative mind racing.  They even have a confessional from the Blessed Sacrament church and an old pinball machine right now.  The last couple times I needed building materials or I needed to improve stuff in and around the house, I've gone there.  And usually have found what I was looking for.

Take this weekend, for instance.  To prepare for the incoming (soon, I hope,) of new chickie babies, I've decided to build an interim chicken coop for the new ladies to live in while they get big and tough enough to live with the older ladies.  They'll start off in the bathroom like our ladies did last year, but they'll have to spend a few weeks outside, and there is no way they'll be inside pooping all over my stuff while they get big enough to handle an already established pecking order.

Of course, I'm hoping to make this coop without buying any new materials.  I already know that I'll have to buy the chicken wire new, but I think I should be able to sneak by without having to buy the rest of the lumber and hardware brand new.  Since my house-building skills are quite lacking, despite nine days building houses in NOLA after Katrina, I went to the ReStore to look for a basic house-like structure that I could make some improvements to, to make it into a suitable chicken house.

I was looking for a large cabinet or a shelf or something with a door already attached.  After walking around the large warehouse for about 15 minutes, I found a crappy-looking, yet sturdy, cabinet in the far back corner.  I think it had been sitting there for a while because there was no price tag on it.  I asked the guy about it and he said I could have it for 15 bucks.  Sweet!  That's less that it would take for me to buy the lumber that was used to build it in the first place.  Awesome.  This also takes the pressure off of me to actually succeed in my chicken house building project, because if I fail, I really only spent 15 bucks.

I'll probably go back there once I figure out my design and get a list of necessary supplies going.  I'll keep everyone updated on how it all comes along...

Oh, if you wanna check the ReStore out, here is their website.

Monday, April 25, 2011

Baking... Rustic Style

Remember a couple months ago I said I did a fun baking experiment but forgot to take pictures of it?  (This one.) I finally got around to doing it again, though it wasn't exactly the same.

Anyone who knows me knows that I loooooove baked goods.  Pastries, cakes, pies, cookies, bread... you name it, I love it.  And think twice about having me babysit your donut if you ever want to see it again.  So it goes without saying that rustic bread makes me very happy.  You know, soft and doughy on the inside, thick and chewy crust on the outside.  It makes the best sandwiches and toast.

I've been making rustic bread for a while now, though when I first started I didn't realize how scientific the whole process was.  You can't just make the dough, let it rise for a bit and throw it in the oven.  No, no.  The whole process usually takes about 24 hours, and requires some special equipment.

This is the trusty website that I used when I first started making rustic bread.  It does a good job explaining the whole process and why it needs to be done that way.  It's a good basic recipe that I use and then make small adjustments based on my bread mood.

For this go-round, just like the recipe calls for, I started with:
3 cups bread flour
1 1/2 cups water
1 1/2 tsp salt
1/4 (heaping) tsp. yeast

I also added two tablespoons sugar and a coarsley chopped head of roasted garlic.  Yep, this is gonna be roasted garlic bread.  Hold on to your butts!

I mixed everything except the garlic and let it rest to rise overnight.  The next morning, the dough was getting nice and bubbly, and I added the coarsely chopped roasted garlic cloves.  I let that rise again for another 10 hours.  Here's the cool part about this bread: the dough is really wet and sticky which makes it nearly impossible to knead without adding too much extra flour to it.  So you don't have to knead it!  Well, kinda.  I just take a wooden spoon or a spatula and just mix the dough (warning: tired arms result,) until it gets nice and elasticky.  That's the sign that the gluten in the flour has developed, giving you a chewier bread.  It doesn't take too long to get there.

Ok, now the good part: baking.  In order to get the right consistency on the crust, (thick and chewy) you have to bake it in something with a lid.  The lid allows the bread to be steamed in a way which results in the awesome crust everyone loves.  I've used pyrex baking dishes before, which work well, but my parents just recently gave me this:

Cast iron, baby!  This thing is awesome... and heavy.  I feel rustic just holding it.  This works the best.  Every since I started baking rustic bread in this, my success rate has doubled.

Ok, so in order to prevent the bread from sticking to the sides, you have to pretty much coat it in flour.  I usually "knead" it one last time just before baking and let it rise again for about 30 minutes while the oven is preheating.  It's also important to put the baking dish, whatever you're using, into the oven while it's preheating.  475 degrees is what you want.  HOT.

(Now just to get off topic a bit:  The reason I was so excited about this when I mentioned it a couple months ago is because that time, I baked it in our wood stove!  Sustainable baking, baby!  I built a fire as usual, but once the fire was almost done, I scraped all the coals to the back and put the cast iron right inside.  I don't know what the temp of the oven was, I think it was pretty low because instead of 25 minutes, the bread took about 45 minutes to bake.  But it worked and it was delicious.  It's too bad we're not really in wood stove season anymore, (even though the weather totally sucks,) but I'll definitely do it a lot next winter.)

Ok, back to the present.  Once the oven is ready, take the dough and plop it into the hot dish while it's still in the oven.  Put the lid on, and set the timer for 20 minutes.  If the top is still not brown after that, add five minutes until it looks like this:
Mmmmm... Now listen to it.  You'll know the crust is right when it talks to you.  It sounds like a light crackling.  Wait 20 minutes, slice a nice thick piece, load it with butter, and enjoy!
What flavor should I make next?

Sunday, April 17, 2011

Accidental Plant Propagation

Remember the cool chicken-proof fence I made a few weeks back?  Well I made it out of random straight-ish sticks that I had lying around the yard after pruning a few trees here and there.  We ran out of sticks at the end so we just harvested a couple more from the apple tree that, still to this day, could use a major pruning even after we hacked off a couple yard waste bins full of branches.  Where was I?  Oh yes, apple branches.  So I remember reading in The Botany of Desire by Michael Pollan that most of the time, apple trees aren't started by seeds, but by cuttings...

Makes me giggle every time.
Let's cut to the chase: I have several baby apple trees now.  Turns out I was unknowingly harvesting and planting live stake apple trees all around my garden.  I can now say that I have a LIVING fence.  Not many people can say that.  Looks cool, huh?

What is a live stake you ask?  Well, there are some plants that can be propagated using already existing branches.  You just cut 'em and stick 'em in the ground, cut side down, making sure that it's in deep enough to have at least one bud under the soil.  That's where it'll root.  It's better to do the live staking early in the spring or late winter before the trees/shrubs leaf out.  Turns out I did everything rights because those babies are haaaappy.

I think it's awesome.

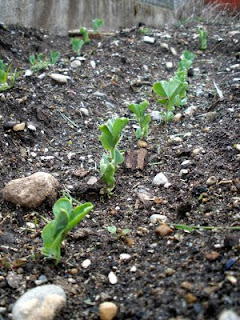
Speaking of awesome, check out my peas.  They are from last year's seeds so I wasn't sure if they would work, but they proved me wrong by all popping out of the ground in unison.  Also, the sunchokes are finally sticking their little heads out of the ground now, which the potatoes have been doing for a couple weeks. 

I played in the dirt for several hours today, continuing the ongoing war against the weeds on my front lawn.  (My strong opinions on lawns will be another post entirely.)  The afternoon also involved harvesting more chicken crap compost and spreading it here and there to prep beds for planting, which I just can't wait for!  I turned an old bookcase into a raised bed to maximize my growing space so that's ready for plants as well. 

I now have dirt under my fingernails, stains on my knees, and the ladies have their crops full of worms.  All's well in this homestead.

Thursday, April 14, 2011

Kare-Pan

About a week ago, I was feeling motivated and in the mood for something Japanese, so I decided to make Kare-Pan.  What is Kare-Pan, you ask?  It is a delicious fried treat that you can find in any Japanese bakery or grocery store.

Basically it's fried bread filled with curry.  Yep, sooooo good.

I had a tupperware full of curry that was taking up space in the freezer so I decided something needed to be done with it.  Mind you, this is Japanese curry, very different from Indian or Thai curry.  No coconut milk, and a much milder, sometimes sweeter flavor.  Curry rice is almost the equivalent of spaghetti here, a go-to dish that any kid will eat, and is super easy to make.

Anyway, you can't just use curry as-is for this recipe, you have to simmer it down to a thicker, more paste-like consistency.  So I dumped the curry into a saucepan and put it on low to start that process. 

In the meantime, it was time to make the dough.  I started with a pretty generic sweet bun recipe.  Let me see if I can remember what I did:

* One packet active dry yeast
* 4 cups bread flour
* one cup milk
* 1/4 cup sugar
* 2 eggs (set aside one tablespoon for later)
* 1/4 cup vegetable oil
* 1 1/2 teaspoons salt

* About a cup of panko breadcrumbs (for later too)

Warm the milk to 110 degrees and dissolve the sugar into it.  Then add the yeast and let proof for about 10 minutes.  Stir in the rest of the ingredients (minus the panko) until combined.  Pour it out onto a floured surface and knead for about 10 minutes, or until soft and stretchy.  Put it back into the bowl with a little oil added to it, roll the ball around to cover it with a light coating of oil and set it aside to rise in a warm place for a little over an hour.

While that's going, check back on the curry.  I had some chopped up sweet potatoes sitting in the 'fridge so I popped those in, and let the whole thing simmer away for about an hour.  Then, since there were still some large chunks of this and that floating around, I used a hand blender and blended the whole thing.  This really brought the curry to the right paste-like consistency, so I took it off the burner to cool.  It should be pretty cool before you fill the buns.

After the dough has risen, punch it down, knead it a little bit, and divide it up into 10-12 pieces.  Roll each of these out, trying to keep the edges slightly thinner than the middle (it's hard to do, so don't worry if it doesn't happen,) and drop a heaping spoonful right in the middle.  Paint a little bit of the egg you saved from earlier around the edges to act as a glue and fold the dough over.  Press the edges to seal to make a nice pillow of deliciousness.  After you've filled all of them, paint the tops with the rest of the egg mixed with a little oil or milk and give them a light coating of the panko breadcrumbs.  Now let them rest for about 15-20 minutes.  Sometimes the seals come open during this resting period, so squeeze them shut if this happens.

The next step is your choice.  Generally, Kare-pan is deep fried.  And of course, that is half the reason they are so delicious.  But, I wasn't really feeling up to getting the whole deep frying process going, so I decided to bake them in a 350 degree oven.  I don't remember how long they were in there, but I waited until they looked like this:

Yes, they were delicious.
They weren't quite the same as real kare-pan since they weren't deep fried, but yummy nonetheless.

On another note, through all the rain and the cold nights, the seeds I planted seem to realize that it is indeed officially spring.  The peas and kale that I planted in the ground are all up and happy, the broccoli, zucchini, and onions in the greenhouse are going strong too.  Still waiting on the tomatoes and peppers, but I'm not gonna rush those.  I planted some lettuce and sunflowers last weekend.  What's next?

Sunday, April 10, 2011

Hang in there

Hello lovely readers.  Sorry for my lack of postings as of late.  School has started and is requiring at least 13 hours of my time being stuck in classes.  I know that does not seem like much, but to go from only being in class an average of 5 hours per week, 13 hours is a lot.  And since I ride the bus and my classes are not stacked nicely next to each other, this results in me being at school a lot.  I'm not complaining, it's only gonna last 8 more weeks.

The other reason is that my camera is dead and I can't find the charger.  Grrr...  I have pictures on it to blog about certain things, so as soon as I get that up and going, I'll have a lot to say, and you will have a lot to see and read. 

Until then, thanks for your patience, and here's a video to hold you over:


They do this several times a day.  Sometimes it's more exciting, sometimes it's even less enthusiastic than this.  Who needs toys when you have someone to mess with all day?
Related Posts Plugin for WordPress, Blogger...